User’s manual
In this chapter:
Common export file parameters
Other parameters of the export file in the csv format
Executing the export
This chapter describes data export options provided by Instant Team to users on the Professional license level. These apply to data exported in csv and HTML formats or in a format complying with the iCalendar standard. Files with the csv extension can be easily opened for instance in MS Excel application, representing a standard export format of table data.
HTML format files make it easier to display and publish the exported data without requiring the use of another application, including Instant Team. The export also preserves most of the formatting settings from the original report, such as column and row separators, colors or alignment.
The iCalendar format is used to export data into calendars provided by other applications and services, e.g., MS Outlook, Google Calendar or iCal. They can also be used to transfer the exported data to other devices such as tablets and cell phones. The calendar you commonly use imports data in a static form, which does not allow for changes applied in Instant Team. To update the data, you need to repeat the export. The advantage of the iCalendar format is that it specifies a simple mechanism for data synchronization. Data can thus be imported into another file repeatedly without duplicating them. If you wish to have your commonly used calendars synchronized with activities scheduled in Instant Team you can use the pre-defined export formulas for web export of tasks and appointments in the ICalendar database available to all Instant Team users. They enable calendar applications to subscribe to data from Instant Team and update them regularly and automatically (see Chapter 6, section Synchronization of tasks with calendars in other applications and Chapter 8, section Synchronization of appointments with calendars in other applications ).
Export preparation
Only data displayed in a specific, currently opened report can be exported. The exact form of the export file then depends on several simple settings described in detail in this chapter.
First select the report the data of which you want to export. Only table reports can be exported. Customize the report to meet you export requirements as much as possible. The export file reflects the current report design, not its default format.
It particularly means that before the export you should:
- select the fields (columns) you want to export
- sort the report as desired
- apply possible filters
- group the records as required
- expand the groups as required
If you are preparing data to be exported in the iCalendar format you also need to name the selected fields in such a way that their name would comply with the iCalendar standard. How to name the fields for iCalendar is described in Chapter 12, section Modifying field definitions.
As soon as the report corresponds to your idea of the export file, it is possible to create the file. This is achieved via the Export/New… option in the Record menu.
Selecting this option you open an export dialog window in which you can set the export file parameters. Some parameters are the same for all formats; parameters specific for the csv format are described separately below.
Common export file parameters
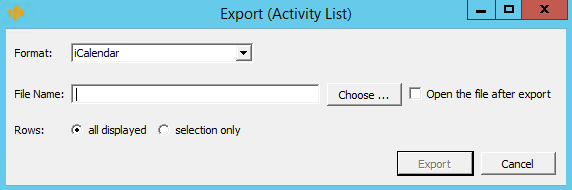
Format
The first parameter is the choice of format. The pull-down menu enables you to select "CSV (semicolon separated)", "HTML" or "iCalendar".
File name
The export file is saved in the standard directory structure of the operating system and always as a file of the csv, html or ics type. The directory and the name of the file can be specified either directly in the input box or you can browse the existing directories using the Select… button.
Rows
This option makes it possible for you to specify whether the export file should contain all the rows displayed in the report or only the rows you have explicitly selected (using the mouse and Ctrl or Shift keys for example).
Open hierarchy
If you export all the displayed rows of a hierarchical report, there is also an option in the export dialog window to specify whether the export file should contain only the rows currently displayed or all the rows up to the selected level of hierarchy. This option is not available for non-hierarchical reports.
Open the file after export
Ticking this checkbox ensures that after completing the export, the export file is opened in the default application set to open the given type of files. In this way, you can immediately verify that the data were exported exactly as you intended.
Other parameters of the export file in the csv format
The export dialog that opens after you select the Record/Export/New… menu and choose the "CSV (semicolon separated)" format enables you to set some parameters specific for the csv format.
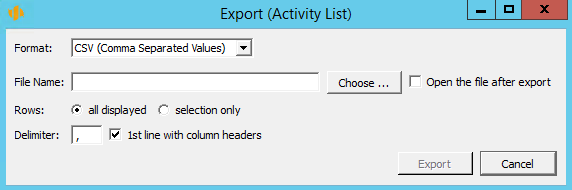
Delimiter
The default delimiter is a semicolon. If you wish that the individual field values are separated in the export file with a different character, enter the required character in this box. Remember, however, that this character must not be contained in values of any of the exported fields.
First line with column headers
If this option is selected, the first row of the export file will not contain actual data but the names of the individual fields as they are displayed in the report to be exported.
Time range
These options are shown only if you are going to export a report containing time-dependent data. One of three options can be selected. The “All” option makes it possible to export all existing data. Use the “As displayed” option to export only data currently displayed in the report to be exported. The “Special” option lets you specify any time interval from-to within which you want to export the time-dependent data.
Executing the export
After setting up the export parameters and pressing the Export button, the file export is initiated. A new pop-up window will inform you about the export progress in which you can interrupt the export if required.

The Cancel button is used to interrupt the export. After successfully completing the export this window closes automatically and if you requested so in the export definition, the newly created file is opened.
When exporting a report displaying a column with attachments, the included attachments are exported as well. They are exported to the same folder as the content of the report but with the name of the given attachment. If a report contains multiple attachments of the same name then the row and column from which it is exported are added in front of the name of the exported attachment. For example, "4x6-attachmentname.extension" means the report had multiple attachments named "attachmentname.extension" and this particular one is from the 4th row and 6th column.
60 days overview of all dates, capacities, inputs and outputs about each project and completely free.
All rights reserved, Created by eBRÁNA Privacy statement