User’s manual
In this chapter:
Calendars
Resource administration
User account administration
Importing a project
Templates
Workgroup administration
If you or your workgroup administrator have not done so yet, we advise you to begin by opening accounts for the individual Instant Team users.
Using the Tools/Workgroup menu, you first open an administration window for your workgroup.
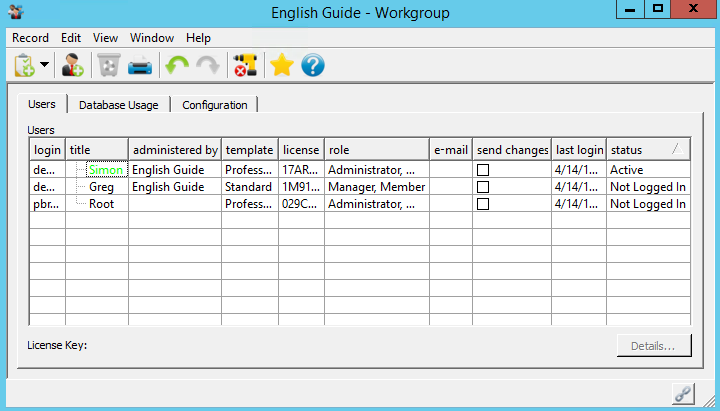
Here you can see the name of the workgroup, the language, the default time zone, the template you use, and a list of users in the workgroup.
The default time zone is used whenever time cannot be associated with a particular user, for example when scheduling tasks that are assigned to resources not belonging to any user.
In all other cases—which is an overwhelming majority—the time zone of a particular user is used. Instant Team assigns time zones to users automatically—it reads the time zone from the operating system when the user is created or when the user was last logged into the system.
The attributes of the workgroup and users are in the built-in databases Users and Workgroup. In these databases you can add fields, set user rights, export data, and generally deal with them as with ordinary databases.
Creating a new user account
Next, you initiate the addition of another user via the New user account button.
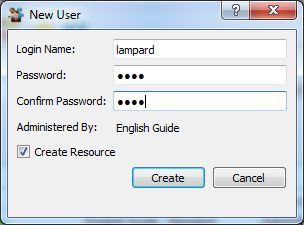
A window opens for you where you enter the login name of the user once and the password for accessing the system twice. If you do not want to let the system create a resource corresponding to the new user then uncheck the Create Resource field (you will get more information about resources later in the chapter).
Only one restriction applies to the login names and passwords. They may not be shorter than four characters. The login name, however, needs to be unique across the entire system.
After you press the Create button, the server starts processing information about the newly added user. If you chose a login name already in use you will be notified of this. Otherwise, a new user appears immediately in your list of users and another window is displayed where you can enter further information on the user.
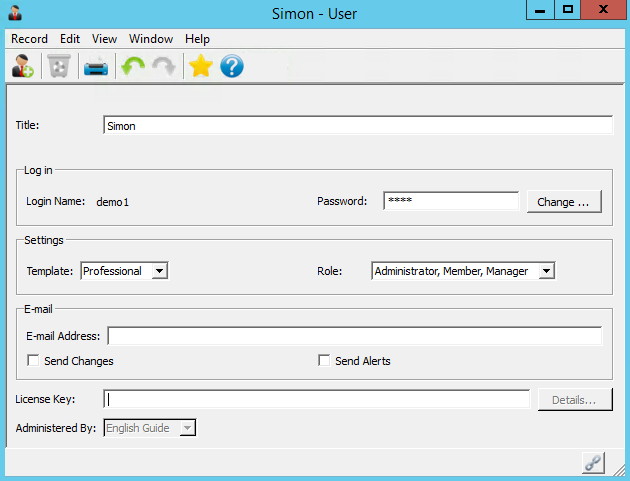
In this window you fill out the full name of the new user, their template and role in the workgroup. For email notification purposes fill in the user’s email address and tick the Send notifications checkbox to activate the option.
Most of the information you specify can be modified later on directly in the table with the list of users.
User roles
In Instant Team, you have available four user roles, which can also be combined: Administrator, Manager, Member, and Supervisor. Follow these rules when using them:
- if the user is to have the right to administrate users, manage resources and project templates or manage shared application customizations, then such user needs to have the Administrator role;
- if the user is to be a project manager of at least one Instant Team project, assign to them the Manager role;
- if the user is to be assigned at least one task in the system, assign to them the Member role;
- if the user is to have the right to see everything but they should not have the right to administrate the workgroup, assign to them the Supervisor role;
- if more than one of the rules given above applies to the user, then assign to them a combination of multiple roles.
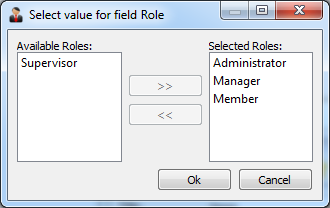
Combinations of roles are common. For instance, project manager is most often also a member—that is, a person in charge of some tasks. The administrator is usually one of the managers as well. To choose a combination of roles, use the option More in the Role field. This opens the following window:
Authorizations of the individual roles are summarized in the following
table:
| ACTION | ADMINISTRATOR | MANAGER | MEMBER | SUPERVISOR |
| Workgroup administration | yes | no | no | no |
| Workgroup customization | Yes, customization can be shared with other users | Yes, but customization cannot be shared with other users | Yes, but customization cannot be shared with other users | no |
| Read resources | yes | no | no | yes |
| Change resources | yes | no | no | no |
| Create and delete resources | yes | no | no | no |
| Notified when resources are changed | yes | no | no | no |
| Read project templates | yes | no | no | no |
| Change project templates | yes | no | no | no |
| Create and delete project templates | yes | no | no | no |
| Notified when project templates are changed | yes | no | no | no |
| Read task templates | yes | no | no | no |
| Change task templates | yes | no | no | no |
| Create and delete task templates | yes | no | no | no |
| Notified when task templates are changed | yes | no | no | no |
| Read projects | yes | yes | yes | yes |
| Change projects | only the “Manager” field | only their own projects (must be listed as the manager of the given project) | no | no |
| Create and delete projects | no | yes | no | no |
| Notified when projects are changed | yes | yes | no | no |
| Read notes, attachments | yes | their own projects | their own projects (must be listed as a project team member) | yes |
| Change notes, attachments | no | until the project is locked | only the ones they created and until the project is locked | no |
| Create and delete notes, attachments | no | yes | yes | no |
| Notified when notes, attachments are changed | no | yes | yes | no |
| Read tasks, appointments, and recurrent activities | yes | their own projects (must be listed as project manager or this is a task/appointment without a project and they are the author) | their own (assigned to them) and those of their projects | yes |
| Change tasks, appointments, and recurrent activities | no | until the project is locked | only their own one-time tasks until the project or task is locked | no |
| Create and delete tasks, appointments, and recurrent activities | no | yes | no | no |
| Notified when tasks, appointments, and recurrent tasks are changed | no | yes | yes | no |
| Read timesheets | yes | their own projects | only their own ones | yes |
| Change timesheets | no | until the project is locked | only the ones linked to tasks assigned to them or belonging to a project where they are among the members and only until the project or timesheet is locked | no |
| Create and delete timesheets | no | yes | yes | no |
You can modify a user’s name or role later on directly in the table with a list of users in the workgroup administration window.
You can also set the user’s role to Inactive. In this case, the user will be temporarily unable to work with any data in Instant Team, but they will be able to log in to the application to see what their situation is. No database or report will be available to them so the user will not see any project, task or another record.
The program will not let you remove yourself from a workgroup or, more precisely, it will not allow you to change your role to a value other than Administrator or a combination of roles including Administrator. If you need to remove one of the administrators of your workgroup then another administrator has to perform this operation. This prevents a situation with a workgroup not having any administrator.
The inactive status is therefore suitable for users that left your team temporarily but can return later on or in case you are introducing a user for whom it has not yet been decided what access rights you want to assign to them.
You can activate an inactive user at any time by setting their role to a value other than Inactive or you can remove the user for good.
If a user has the right to change resources, templates, projects, tasks, and notes/attachments then they are also notified of their changes in the form of boldfaced records or possibly email notifications as well.
Changing user password
Administrators can also change login passwords for already created users. To do that, use the Modify… button in the user properties editing window.
In the window that opens afterwards, you need to enter the administrator’s password and then twice the newly requested password for the selected user. The change takes place after you press the Ok button and the server validates your password and equality of the two user passwords.
Removing a user
In the toolbar above the list of users you will find the Delete button, which serves to delete user accounts.
When a user is deleted the resource or resources created for the user will not be removed automatically. Therefore tasks and timesheets assigned to their resource(s) will remain assigned.
Monitoring user activities
Users are highlighted in your workgroup list (see Figure 3.1 above) if they currently work with the application.
If a user performed at least one operation within the last hour (they viewed a record, for example) then they will be highlighted in green in the summary. If a user did not perform any operation within the last hour but they are currently running the application then they will be highlighted in yellow. The other workgroup members will be printed in the standard black color.
For each workgroup member the time of their last login is available in the list.
The workgroup member list also enables you to display the version of the client the user used the last time they logged in to the system. This value is available as the "Last logged in with" field.
Another field available in the member list is called "Last time impersonated" and it contains information about who was the last to log in as this user.
Database usage
The last activity reserved to Instant Team administrators is database saturation tracking. This is achieved using the second tab in the workgroup administration window.
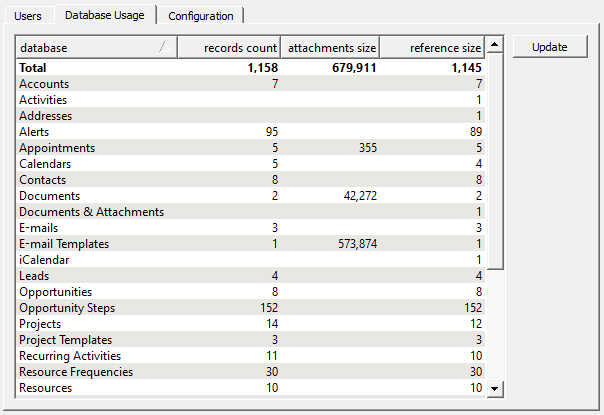
In this tab, you will see a synoptic overview of the number of records in the individual Instant Team databases, the total size of the saved file attachments, and, at the bottom, also the sum total for all databases. The "Reference size" column then contains the number of records in the individual databases, which is calculated, stored, and used to optimize database access. The reference size is updated automatically once a week, however, it can also be updated manually by pressing the Update button next to the database list.
Calendars
Instant Team enables you to create and use Calendars that serve to set working and non-working days and hours. The calendars are used to set the working hours of resources (Chapter 3, section Resource administration), to schedule tasks automatically (Chapter 5, section Automatic scheduling), to check resource overloading (Chapter 5, section Conflicts in a schedule), and to highlight non-working hours in a Gantt chart (Chapter 11, section Customizing the Table report). Calendars are stored in a separate database, which can be accessed from the Navigation panel.
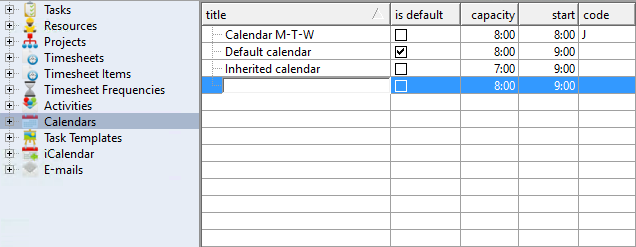
Before starting a new calendar you first need to switch to the Calendars database (by clicking on the calendar icon in the database panel or via the View/Databases/Calendars menu). Next, use the <Ctrl+N> shortcut key or the Record/New/New Calendar menu to create a new calendar.
A new row is generated in the report where you can enter data about the new calendar using the editing fields. Press <Tab> and <Shift> + <Tab> keys to move between individual fields in the report or click on the separate fields of the new calendar with your mouse.
To start off, it is enough to fill out the Title field for the new calendar and then to save the calendar (using, for example, the <Enter> key). From now on the calendar is available to be assigned to resources. Other information about the calendar (such as the Capacity field specifying the working hours) can be edited at any time in the calendar properties window which opens, for instance, after a double-click on the new calendar row.
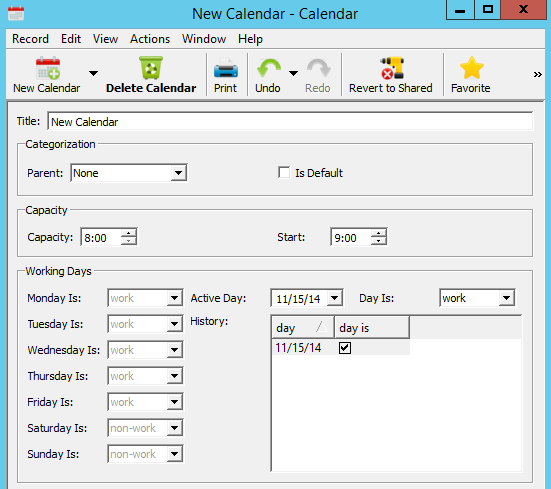
Title serves to briefly characterize the calendar.
The Parent field enables you to create a hierarchy of calendars. If you select one of the existing calendars here then all data from its parent will be copied into the present calendar. If you change an item in a parent calendar the changes will be copied to its descendants. With each descendant it is possible to modify any entry, which will then not be overwritten when the parent calendar is modified.
The Is Default check box enables you to set a calendar as the default one. Resources that do not have a calendar set will be assigned this calendar. The default calendar is also used when automatically scheduling tasks that do not have any resource assigned to them (the owner is not filled out) or that have several resources assigned to them. If no calendar is set as the default one then the default is the built-in calendar, that is, Monday through Friday, 9:00 AM – 5:00 PM.
The Capacity field serves to enter the working hours of a resource. The default value is 8 hours a day. Capacity is the same for all weekdays.
Enter the beginning of the resource’s working hours in the Start field. The default value is 9:00 AM. The beginning of the working hours is the same for all weekdays.
You can set which days are weekdays and which are not in the Workdays section. By default, workdays are Monday through Friday and days off are Saturday and Sunday but this setting can be changed for some resources. In addition to setting the weekdays, you can also determine which specific days are or are not working days. This setting will have priority over the weekdays setting. For example, if a resource is working on Saturday, November 14, 2015, enter this date into the Active day field and set the Day field to the value workday. Then this day will be displayed in the table. You remove a date from the table by selecting it and setting the Day field to the value Default.
Resource administration
Resources in Instant Team are users or other persons that you can assign tasks to.
In the simplest case, the list of resources is identical to the list of users in your workgroup. You can achieve this situation by keeping the Create Resource field checked whenever you create a new user and by not deleting any user. In that case you can skip this subsection since you will not have to deal with resource management.
If this situation is inconvenient to you it is likely to be due to one of the following reasons:
- You want to assign tasks to persons that are not and shall not become users of Instant Team,
- You delete some users, or
- You want to enter into the system a user to whom you do not want to ever assign tasks at any cost.
How to resolve such situations in Instant Team will be described below.
Resources without users
If you want to assign tasks to persons who are not users of Instant Team, you will have to create resources for them first and you will have to do it in a different way than simultaneously with creating a user as described above.
First switch to the Resources database (the View/Databases/Resources menu) and then create a new resource using the Record/New/New Resource menu or the <Ctrl+N> shortcut key or the toolbar button. A new row appears in the report where you can specify information regarding the resource you just created.
You can also enter and modify at any time all information on a resource in the resource properties window, which opens, for example, when you double-click on a row with the resource selected.
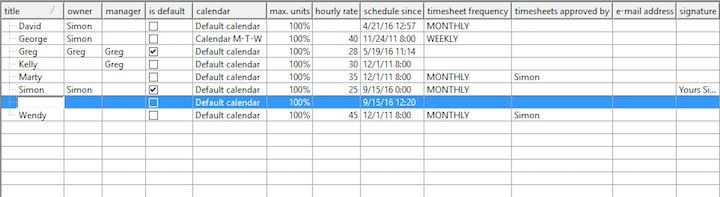
Enter the name of the resource into the Title field and then save the resource (using the <Enter> key, for instance). From now on, the resource is ready to be assigned to tasks or eventually to record time that the resource spent on tasks.
If you leave the Owner field blank then only project managers will be able to enter information about tasks and timesheets of this resource in individual projects. If, however, you fill out this field then the user you specify here will be able to work with tasks and timesheets assigned to this resource as if they were their own.
Use the Calendar field to select one of the work calendars defined previously, see Chapter 3, section Calendars. New resources are assigned the calendar that is set as the default one. If no calendar is set as the default one then new resources without a calendar specified are assigned the built-in calendar, which means Monday to Friday, 9:00 AM – 5:00 PM.
The Is Default field serves to indicate resources that actually represent users shown in the Owner field. At most one resource of a given owner can be marked as default.
The Hourly Rate field is used as the default hourly (cost) rate for tasks assigned to a given resource (see Chapter 9, Costs).
The hourly rate is the so-called historic-value field which means that it can have different values at different points in time. Thus, you can define that the hourly rate of a resource changes starting on a specific day.
The Max. Units field defines the percentage of the resource availability. A value higher but also lower than 100% can be entered. The value of 100% corresponds to 8 hours on workdays. This makes it possible to simulate resources available only part-time for the project or resources representing a group of people. The value of this field is reflected in resource overload alarms and in automatic scheduling. Max. Units is also a historic-value field and thus its value can change in time just like the value of the Hourly Rate field.
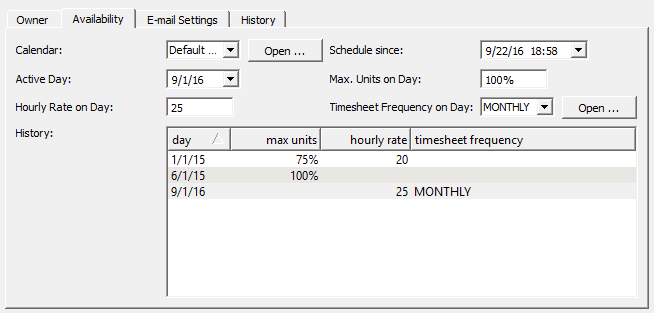
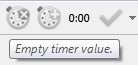
The Schedule since field determines from when the resource should be utilized in case of automatic scheduling (see later in the text). If the Timer is used then the last timer-reported time is automatically recorded in this field. But this field’s value can also be modified manually—independently of the Timer—ensuring that automatic tasks will be planned for the particular resource from the specified time.
Altogether, there can be three types of resources:
| Resources without owners
| Resources representing persons who are not listed as users of Instant Team. Entering data on behalf of these resources can be done by project managers only.
|
| Resources with owners that are not marked as default
| Resources representing persons who are not listed as users of Instant Team. Entering data on behalf of these resources is delegated to their owners.
|
| Resources with owners that are marked as default
| These are resources that represent users assigned to them. This resource is used as the default when the user creates new tasks or timesheets.
|
If you have created a resource for a person who was not a user of Instant Team and that person should become the user now, follow these steps:
- Uncheck the Create Resource field when creating a user for this person,
- enter the new user as an owner of the existing resource and
- mark this resource as default.
Deleting a resource
When you delete a user, all resources assigned to them will remain in the system. Thanks to that, all tasks and timesheets assigned to the user’s resources will keep their assignments, which is desirable in most cases.
Nevertheless, there can be a situation, such as creating a user by mistake and deleting them immediately, where you will want to get rid of a resource for good. In this case, it is enough to delete the resource via the Record/Delete menu in the properties window of the resource or after selecting the resource in the Resources report, or possibly also using the Delete button in the toolbar or the <Ctrl+D> shortcut.
Removing the resource will cause all tasks and timesheets assigned to the resource not to be assigned to anyone from now on. You will thus loose information that can be useful later, so always think twice before you delete any resource.
Users without resources
If you want to enter into Instant Team a user to whom you do not want to assign any tasks or timesheets, it is sufficient to uncheck the Create Resource field when creating the user. If you have already created the user and kept the Create Resource field checked during the creation, you can of course delete the already created resource later, as described above.
If you, on the other hand, change your mind later and want to start assigning tasks to this user, then just create a new resource, enter the user as its owner and mark the resource as default.
Resource names
Because resource name and user name are two mutually independent items it is possible for resources representing real Instant Team users to have a name different from user name and that can be confusing when working with such resources.
To prevent such situations, the name of a resource with an assigned user can be set to an empty string or not entered at all. The name of the resource is then automatically derived from the user’s name. The value in the Title field (the full name of the assigned user) is then shown in gray. When the full name of the user later changes, the resource name automatically reflects that. All resources created within the user creation process have an empty name and thus follow the name of their assigned user.
When leaving the resource title blank, keep in mind that:
- If you leave the title blank in more than one resource of the same user, all these resources will have the same name and will thus be indistinguishable;
- If you later change the owner of a resource with an unspecified name, the name of the resource will change as well, which is not always desirable;
- A resource without a name keeps the name of the original owner even after the user is removed from the system and thus no longer appears in the Owner field.
User account administration
At this point we have gone through all administrative operations reserved to administrators. What is left are operations reserved to the individual users. We have already mentioned password changes in the preceding text.
This action is available via the Tools/Account menu that opens a window with basic account information.
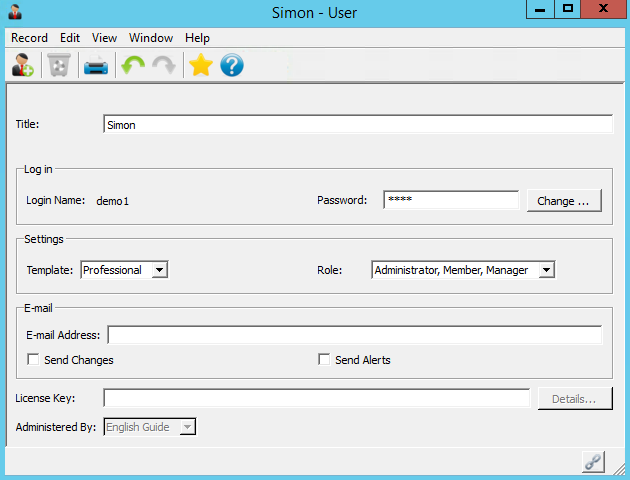
You can see your login and real names here, the template you have selected, your email address and a checkbox defining whether you wish to receive email notifications of record changes. You can modify certain account settings.
Email notifications
Using the Email Address and Send Notifications options, it is possible to make the Instant Team application send you an email in case another user modifies or creates a record that you are entitled to view.
Changing a password
The next button in the basic account information window is called Change… and serves to change the password. The change is performed in a separate window:
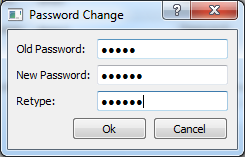
The rule that applies to the new password is the same as for the original password, i.e., the password needs to be at least four characters long. After you press the OK button, the application verifies on the server whether you correctly entered the original password and if so, your password will be changed. If not, you will be notified of this.
Customizing user accounts
Using the Edit/Preferences… menu, you open a window where you will be able to set additional parameters of your account.
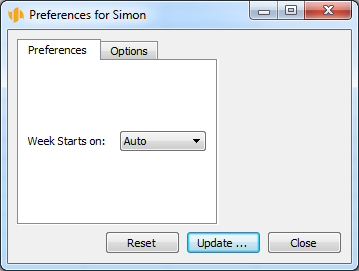
In the Preferences tab you have available the Week starts on setting with possible values of Monday, Sunday, and Auto. This setting affects the way calendar and reports containing weekly time-based data are displayed. The Auto value means this is determined by the preset application language.
The Settings tab contains additional user account settings.
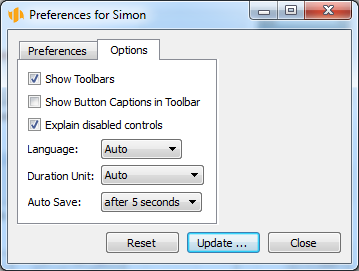
Show Toolbar Buttons enables you to save precious screen space: when turned off, it hides the toolbars. This, however, comes at the expense of the fact that the functions you use often will no longer be a single mouse click away and, instead, will only be available via menus.
Show Button Captions in Toolbars also saves screen space. If you turn this check box off, the toolbar will be reduced to less than half its original size. Although you will not see captions for the individual buttons, they will be accessible through the tooltips if you hover the mouse over a specific button for a moment.
This setting can also be modified via the local Show Button Captions menu, which is displayed if you press the right mouse button in a toolbar or menu area.
Explain Disabled Controls enables tooltips that are displayed over disabled controls if you hover the mouse over them for a while and it gives an explanation why the given control is disabled.
You can also change this setting via the Help/Explain Disabled Controls menu.
Language—this drop-down menu will offer you a choice of 34 different languages or the Auto setting. The language selection will affect all messages and texts in the application and also the cultural setting of the application. The Auto setting means the operating system’s language setting is used.
The application is currently fully localized in Czech, English, and German versions only. Therefore, if you select Czech or Slovak as your language option then all messages and texts will be in Czech; if you select any other language apart from German then the messages and texts will be in English. Cultural features, such as the appropriate decimal number separator, will be adopted according to the selected language.
The language preference also influences which day is considered the first day of the week by the application. For English and German this is Sunday, for Czech it is Monday.
The language setting is not applied to the login window or, more precisely, before you successfully log in to the application. This is because the language setting is independent for each user and Instant Team naturally does not know which setting to use for a particular user before login. Therefore, texts displayed before login conform to the system language setting.
The Duration Units setting determines the way the application is to display duration type data, for instance task effort estimates.
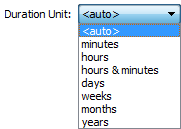
You can select one of the predefined units or the so-called automatic mode when Instant Team automatically selects the most suitable unit.
After selecting a particular unit, values that are not exact multiples of the unit are displayed in the form of a decimal number (except for hours and minutes). In the automatic mode, the remainder of the value is expanded in lower-level units. Thus with the unit set to “hour”, the value of two and a half hours is displayed as 2.5h while in the automatic mode this is 2h30m. If you select the hours and minutes option then duration will be displayed in the form h:mm, that is, 2:30, for instance.
The predefined duration units do not correspond to calendar time but to work time.
One hour still has 60 minutes—there is no difference here—but one day no longer has 24 hours and instead it only has 8 hours (and thus 480 minutes). One week then has 5 days (2,400 minutes). A month has 4 weeks (9,600 minutes) and a year 12 months (115,200 minutes).
If we express time in hours then one week has 40 hours, one month 160 hours, and one year 1,920 hours. Similarly, one month corresponds to 20 days and one year to 240 days.
Auto Save option specifies the time interval between successive automatically saved text values. The following options can be selected from the pull-down menu: “after 5 minutes”, being the default option, “after 1 minute”, “after 5 seconds”, “immediately”, and “never”.
If you modify your account settings but are not satisfied with it you can quickly return to the default setting using the Reset button.
Importing a project
New projects can be created either directly in Instant Team, see Chapter 4 below, or project data can also be imported into Instant Team from the MS Project application.
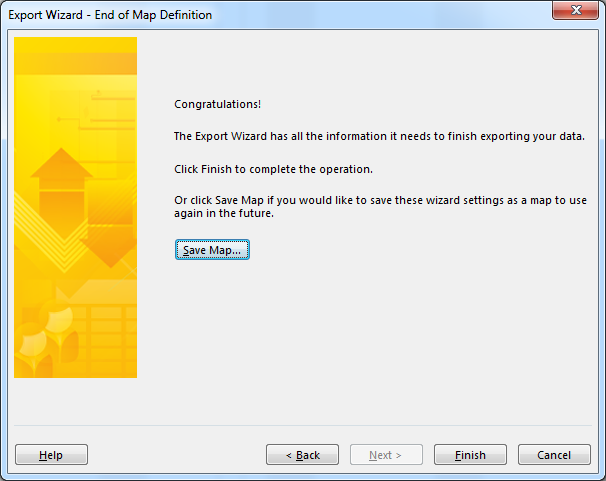
Before importing any data, tasks must be first exported from MS Project in the csv format. The export file can be created using the export wizard. Use the "File/Save as…/Save as CSV" option in the MS Project 2007 application. While in the export wizard, create a new field mapping that contains the following columns (in the order given below): Project, Outline level, ID, Name, Remaining work, Resource names, Start, Finish, Predecessors—see the figure.
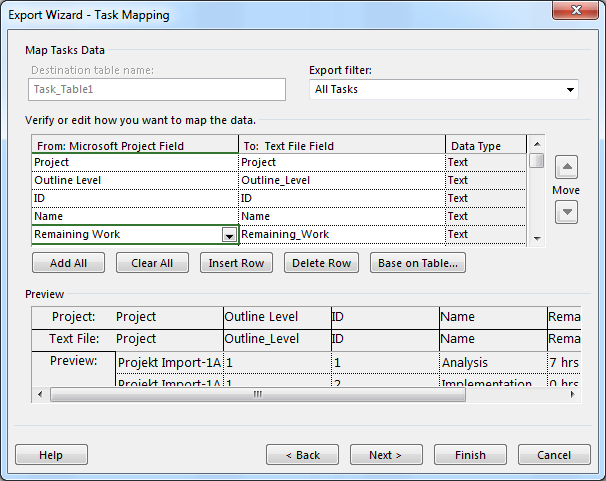
Before closing the MS Project export wizard we recommend saving the field mapping created for the purpose of importing data into Instant Team—see the figure. You will be able to use the saved mapping in any later exports.
A project with the same name as the imported project and resources with the same names as the resources used in the project must be created in Instant Team in advance.
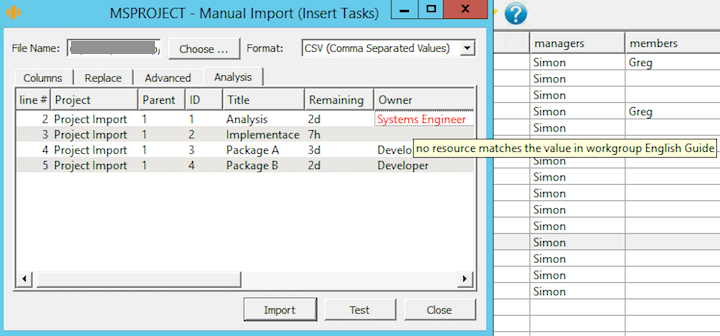
If the above preconditions are met, log in to Instant Team as a workgroup administrator and open the MS Project import window using the “Record/Import/MSPROJECT” menu. Enter the import file name here or use the magnifying lens icon to look up the file in your computer’s directory. Clicking the “Import” button then executes the import itself.
However, before actually importing the data, we recommend to test the import file first. After clicking the “Test” button, the application compares the import file with the import formula, listing any incorrect rows on the screen without writing any data to the database. Possible errors in imported data will be highlighted in red. Detailed information about the likely cause of the error can be displayed by pointing the mouse to the red data.
Depending on the nature of the error, make changes to the import file and then test it again in Instant Team. If the import file contains no red data, the import can be executed using the “Import” button. In order to show the “Import” button after testing, the testing results must be first removed using the “Clear” button.
If you imported a file with erroneous rows, these rows would show in the file analysis window after the import finishes. The erroneous data in these rows will be printed in red again. Correct the erroneous rows and insert them in a new import file which should contain only the originally erroneous rows. Then try to import them again.
Templates
If you are managing projects with the same or similar structure repeatedly you can create a template for them or based on them.
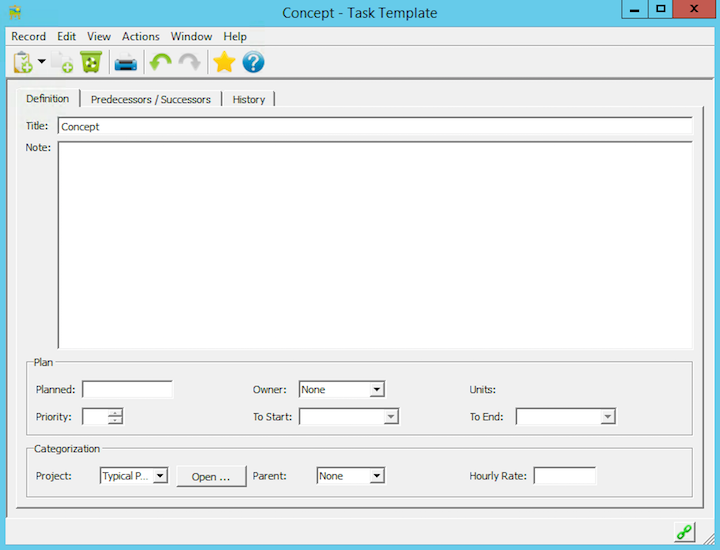
You do this using the New Project Template and New Task Template actions and the Templates report. Creating the templates proceeds analogously to working with real projects (see the following chapters) but you only have available some of the real task fields.
You can also create a template directly from an existing project using the New Project Template/New Template from a Project… menu above the row containing the selected project. When you have a project template ready you can create a real project using the New Project from Template action and Instant Team will automatically fill in tasks according to the selected template. Afterwards, you can further modify, add or delete the tasks.
60 days overview of all dates, capacities, inputs and outputs about each project and completely free.
All rights reserved, Created by eBRÁNA Privacy statement