User’s manual
In this chapter:
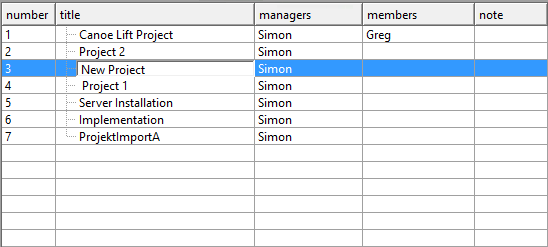
Instant Team data are of several basic types and we summarized them in the following table for the sake of clarity:
| TYPE | DESCRIPTION |
| Projects | The basic data division unit in Instant Team. On the project level, you can also specify details of users’ data access rights. |
| Notes and attachments | Serve to attach documents or other useful information to a project and to share them among project team members. These can be contractual documents, status meeting minutes, methodical instructions, project deliverables, etc. |
| Tasks | Work performed or required to be performed on a project. |
| Timesheets | Information on how much time particular users spent on individual project tasks and on which days. |
| Resources | Users of Instant Team and other persons to whom it is possible to assign tasks. |
| Calendars | Work calendars determine the labor capacity of resources on the individual days. |
All records beside resources and calendars are either directly or indirectly linked to projects and thus before you begin entering any other data you first have to set up a project or projects to which the data will relate.
Setting up a project
Setting up of projects is reserved to users in the Manager role.
First, you need to switch to the Projects database (by clicking on the project icon in the database panel or via the View/Databases/Projects menu). Next, use the <Ctrl+N> shortcut key or the Record/New/New Project menu to create a new project.
A new row is generated in the report where you can enter data about the new project using the editing fields. Use the <Tab> and <Shift> + <Tab> keys to move between individual fields in the report or click with your mouse on the individual fields of a new project.
All the required information about a project can also be entered and modified at any time in the project properties window, which opens, for example, when you double-click on a row with the project selected (see Figure 2.19, A recently created project).
Fill out the name of the project in the Title field—you can still give more details in the Note field. The most important fields are the Managers and Members fields that together specify the project team.
Project team
The Manager field contains the selected users who have the right to manage the project. The window used to change a selection is displayed after pressing the Modify… button to the right of the field in the project window or after selecting the option More… from the editing menu of this field in the report.
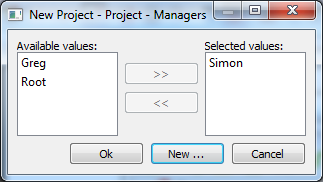
When creating a new project, the currently logged-in user is automatically listed among project managers. The currently logged-in user also cannot be removed from the list of managers since a particular project manager can only be removed from the project by another project manager of the same project. This ensures that the project always has at least one project manager.
The Members field contains a choice of users who have the right to see all project’s tasks and some other rights (see below). It is not necessary to repeat project managers here because they have these rights automatically.
If a specific person is not listed among the available users, the administrator can use the New… button to create a new user. If the current user does not have the administrator role, they cannot add new users and thus the New… button is not displayed. For more information about creating users, see Chapter 3 above.
Access rights
Access rights of a particular user regarding a specific project follow from the combination of the user’s role in the system and the fact whether the user is listed between the managers or members of the project.
The situation is simplest for users in the Administrator role. In this case, their membership in a team does not determine anything. They can always see all records but they can only change the Managers field in project records.
Users in the Manager role, who are listed between project managers, become managers of the given project (there can also be more of them). This means that they can see, change, create, as well as delete any records (tasks, notes and attachments, timesheets, appointments, and recurrent activities) attached to their projects and they can also change the project header. Vice versa, if a user in this role is not listed in a team then the user does not have any rights in this project. The user can see the project header but this is enabled for all users active in the system regardless of their roles.
Access rights of users in the Member role are the most structured ones and depend on the record type.
| RECORD TYPE | RIGHTS OF USERS IN THE MEMBER ROLE |
| Note, Attachment | If on a team, users can see all notes and attachments attached to a project and also create their own notes/attachments. Users can also modify and delete their own notes/attachments. |
| Task, Appointment, and Recurrent activity | If on a team, users can see all tasks, appointments, and recurrent activities of a given project. If not on a team, users can only see those that are assigned to them (the user is specified as their owner). In any case users can only change items assigned to them and these changes are restricted to just a few fields. They may not create or delete tasks, appointments, and recurrent activities. |
| Timesheet | Users can only see their own timesheets (they are listed as owners). They can only modify timesheets linked to tasks assigned to them (they are task owners) or tasks belonging to a project where they are on the project team. |
There is an important lesson to learn here: you do not have to be a project team member to be able to participate in a project, i.e., to be assigned project tasks and to be allowed to enter their progress. However, if users are not project team members then they will not see their project tasks in relation to other project tasks and neither project notes nor attachments will be available to them.
Not taking into account the Administrator role, we can say that the relationship of individual persons to a particular project can fall into four categories:
| RELATIONSHIP DESCRIPTION | ROLE5 | PROJECT MANAGER6 | PROJECT MEMBER7 | TASK ASSIGNED8 |
| Has nothing to do with the project. | Irrelevant | no | no | no |
| Project participant without the right to access project data | Member | no | no | yes |
| Project participant with the right to access project data | Member | no | yes | Irrelevant |
| Project manager | Manager | yes | Irrelevant | Irrelevant |
1It suffices if the user role setting includes the role indicated here. If it shows, for example, the Member role, then the row is equally applicable to the “Member” role as well as to the combined roles “Member, Author”, etc. 2If the user does not have the Manager role nor its combination then it is not important whether they are listed among project managers. 3If a user is not assigned the Member role nor its combination then it is of no consequence whether they are or are not listed as project members. 4If a user is not assigned the Member role nor its combination then assigning them a task is of no consequence regarding their relation to a project.
Project hierarchy
It is possible to organize projects into a hierarchy. To do this, use the Parent field. You select the new project parent from the drop-down menu for this field in the project window. You can also change project hierarchy directly in the project report by dragging projects with the mouse.
You just go to a report and select a project you want to move within a hierarchy and drag it to its new parent while holding the mouse button.
Project parent can also be set automatically. Just select the required parent before creating a new project in a report and use the Record/New/New Subproject menu or the <Shift+Ctrl+N> shortcut key to create a new project. The Parent field will be preset to the selected project.
Project numbering
The projects you create are numbered automatically by the system in the order they were set up. Project numbers cannot be changed directly; however, you can move projects and thus achieve their renumbering.
To change their order, use the Edit/Move Up and Edit/Move Down options and the corresponding <Alt+Shift+Up> and <Alt+Shift+Down> shortcut keys, respectively. As suggested by their names, these actions move the selected project (or possibly multiple projects) one position up or down. Concurrently, the number of the selected project increases or decreases and the other projects are renumbered, too.
You can also use the mouse to change project order. Just select projects and drag them to a position among other projects or possibly below the last or above the first displayed project.
If you need to revert to the unsorted report version you can either reset all report customizations (that is, including the sorting setting) using the View/Report/Reset shared menu or cancel the sorting by clicking repeatedly on the header of one of the columns in a report. This is because by clicking repeatedly on the header of a column you successively switch between ascending sorting by this column, descending sorting by this column, and an unsorted report.
Locking projects
You can lock projects that have already been completed or that are no longer required to be updated for another reason. You can do this using the Locked field in the project window. Only the manager of a given project can lock and unlock it.
In locked projects you cannot change any records attached to them. You can only change their headers. Locked projects also disappear from the default project report. To display them, use the Locked report. To switch between locked and active projects, use the pull-down menu in the basic toolbar or the View/Report/… menu.
Notes and attachments
We have thus covered all fields that you fill out in the first tab in the project window and we can proceed to the second tab, which shows notes and attachments attached to a project or attachments attached to one of project tasks or appointments.
The tab contains an overview of all project notes and attachments created so far together with author name and time they were created and, at the same time, a summary of all tasks and appointments in a given project with attachments attached directly in the task or appointment window. To ensure better orientation, the individual record types are distinguished through graphical icons.
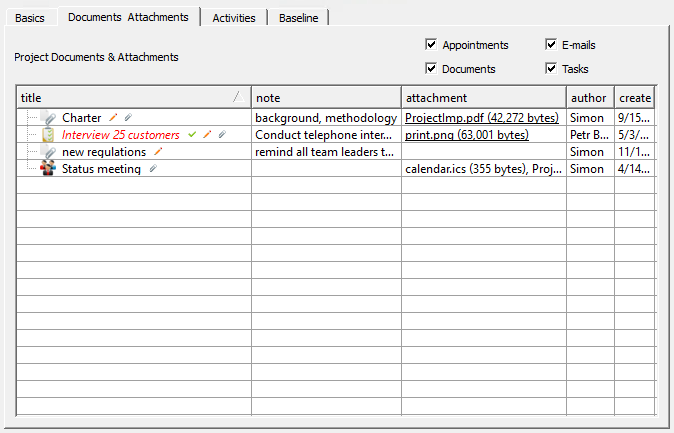
You can view the existing records by double clicking on the corresponding row or using the Properties… option within the local menu for the given row (the local menu pops up when you click the right mouse button).
Any member of a project team can also create a new note or attachment using the Record/New/New Project Note/Attachment menu or the analogous button in the toolbar. You can apply this procedure not only in the project window but also in reports containing projects (for example in the Plans report in the Tasks database).
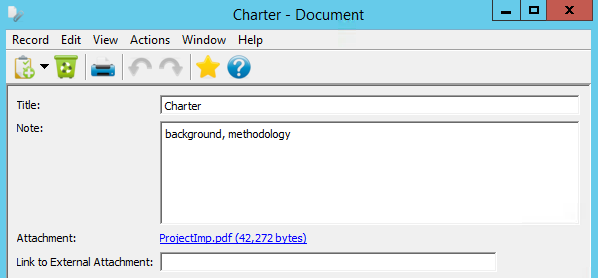
The note/attachment window is simple. You enter here the name of the note/attachment and then a detailed text in the Note field; you can insert a web page link into the External attachment link field. In the Attachment field you attach (by clicking on the Attach… button) a file of maximum size 5 MB.
This file is posted to the server and any member of the project team can then view it on their computer by clicking on the name of the attachment (which works as a web link) or selecting the "Open attachment" option from the local menu, which is displayed after you click the right mouse button on the name of the attachment.
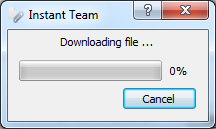
In that case the file is downloaded from the server to a temporary file folder on the given user’s computer and it is opened from there by a program associated with the given file type.
The attachment can also be saved in an arbitrary folder in the user’s computer by selecting the "Save attachment as…" option from the local menu.
The attachment can further be deleted by selecting the "Delete attachment" option from the local menu.
For the change to take effect also within Instant Team, you have to attach the modified file to a note/attachment—either to the original one or to a new one if, for example, you wish to keep the previous version as well or you are neither the author of the original note nor a project manager.
60 days overview of all dates, capacities, inputs and outputs about each project and completely free.
All rights reserved, Created by eBRÁNA Privacy statement