User’s manual
In this chapter:
Timesheets are an integral part of project management in many types of organizations. This functionality is naturally also part of Instant Team. Instant Team enables you to both retrospectively record time spent on tasks and continuously record time using the built-in Timer. It supports timesheet approvals by project managers as well.
Creating timesheets
Timesheets can be created by the individual task owners but they can be created or modified also by members and managers of projects where these tasks belong.
To retrospectively record time spent on tasks you can use the New Timesheet button that appears wherever there are tasks available to you. This means in task reports, in the task window, and also in some timesheet reports. First you need to select a task for which you want to create a record. After you do so and press the New Timesheet button or use the Record/New/New Timesheet menu, a window opens, containing a new timesheet.
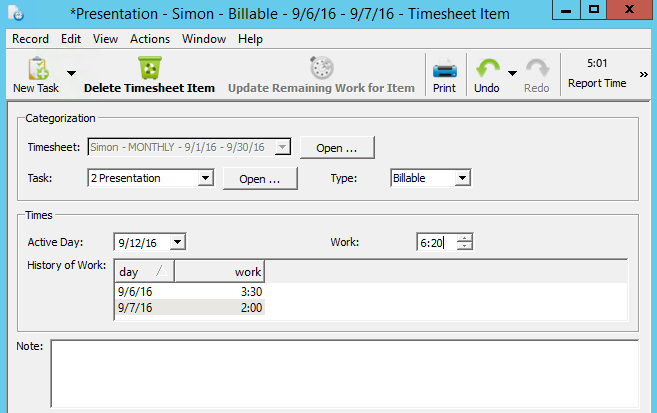
The Task field is preset to contain the task you have selected above. The record owner, which is the person that spent the reported time on the task, is pre-completed to contain your default resource and the record type is Billable.
The Owner field
If you have the Member role in the system then you can only change the timesheet owner to one of your resources, that is, you can only create records for yourself. Moreover, the task you create a record for has to be assigned to you or belong to a project where you are listed among project members. If you are a project manager you are absolutely free. You can thus create timesheets for other team members and also enter data for tasks the owner of which does not match the timesheet owner.
The Type field
The timesheet type serves to enable prospective further processing of timesheets and it can be set to these values: Billable, Non-billable, Vacation, Downtime.
Entering times for individual days
Yet, the most important field in this window is the Work box. Here, you enter time data of a given type that you want to report for the selected owner, task, and day you chose in the Active Day field. The entered data appears immediately in the History table underneath.
The Active Day field
The value in the Active Day field is not important in itself and it is not recorded in the timesheet. It only serves to determine the day for which the reported time is displayed and entered in the Work field.
The Work field
In the Work field, you enter the time reported for the active day. Time is entered in the form hh:mm—for example, 7:13 means seven hours and thirteen minutes. The maximum value is naturally 24 hours.
The History field
The History table then shows all values entered. By selecting a row in History, you also change the active day to the day in the selected row, which enables you to modify more quickly time data for a day you have already entered.
The list only specifies times entered within this timesheet. There can be multiple records for a single task and values entered in one record are independent of other records. For example, if you work on a task for two weeks and use weekly reporting then you are likely to have two records for this task in Instant Team.
The Timesheets tab in the task window
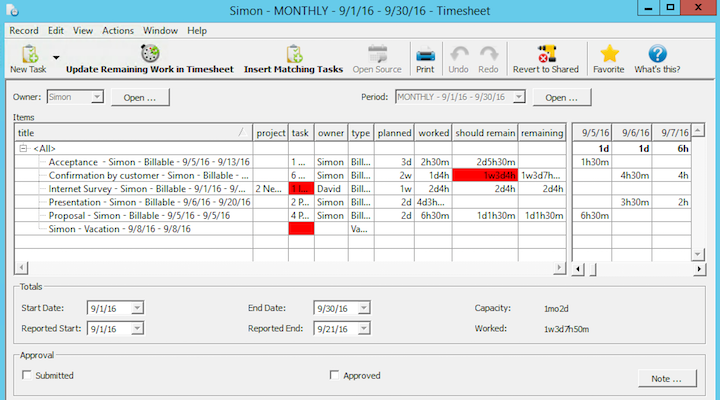
You can get a consolidated view of timesheets for a given task in the task window, using the More button in the Timesheets tab.

Here you can see all timesheets for an open task including its owner, total time reported in the timesheet (the Worked column), and information required to approve the timesheets.
The My Timesheets report
Users in the Member role can get an even more consolidated view of all their timesheets in the My Timesheets report in the Timesheets database (the View/Databases/Timesheets menu and then View/Report/My Timesheets).
This shows all your timesheets regardless of the task or project but only for the selected period of time.
This period is the time interval displayed in the right part of the report, in the so-called value line. By changing the zoom of this section or changing the number of columns shown here, you can easily achieve almost any time period selection, so browsing into the past and future is very simple if you use the scrollbar under the right part of the report. When zooming in on a single day, the right part of the report highlights weekends in pale gray.
In addition to the details on a timesheet, you can also see here times recorded for the individual days and, in the <All> row, the sum of all your timesheets for the selected period. Using report parameters in the Format Toolbar, you have an additional option to restrict timesheets to a specific project, type or approval process status. As you can see, this report is very flexible.
Approving timesheets
After you have created time reports for the previous period, it’s time to approve them. Timesheets can have three different approval statuses: To Submit, To Approve, and Approved.
The Timesheets to Submit report
The To Submit status is the default status and the best way to get a general idea of all your timesheets with this status is to use the Timesheets to Submit report (the View/Report/Timesheets to Submit menu).
This is an analog of the My Timesheets report. It is also accessible only to users in the Member role or in a combined role incorporating the Member role. However, it only shows records with the To Submit status, it does not have any parameters, and although it contains the Value Line in the right part of the report, records are not filtered by the Value Line setting. Therefore, you also find here records for which—for example—you have not yet entered any time data by mistake.
If you feel like writing to the project manager and explaining some of your timesheets before you send them to the manager to be approved, you can do so in the Note field. Next, you mark records you want to hand over to be approved and check the Submitted field. Thanks to this, the status of these records changes to To Approve and they are thus removed from this report.
The Timesheets to Submit report is also included in the Overview database.
The Timesheets to Approve report
Submitted records appear in the Timesheets to Approve report, which is available to project managers only.
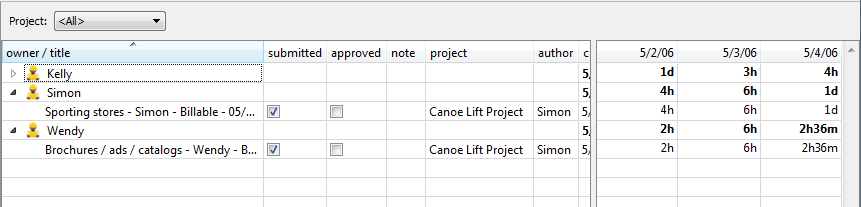
This is again analogous to the two previous reports. It only shows records with the To Approve status for all projects managed by the logged-in user. The report shows the Value Line but it is not filtered by its data. To facilitate approval, records are grouped by their owners and you can thus also see here the total time reported by the individual owners during the displayed period.
Project manager can approve the displayed records by checking the Approved field or return them to their owners by unchecking the Submitted field. In case of a rejection, it is appropriate to write an explanation into the Note field.
The Timesheets To Approve report is included also in the Overview database.
Locking timesheets
Approved timesheets change their status to Approved and are removed from both previous reports. What is important, however, is that approved timesheets can no longer be modified by the owners of these records. They become locked for their owners. Yet, the project manager still has the option to modify these timesheets and this applies until the moment when an administrator locks the entire project (see Chapter 4, Projects).
Timesheet analysis
When analyzing timesheets, project managers use a quartet of reports: By Status, By Type, By Task, and By Owner.
These reports are almost identical, they only differ in the way timesheets are grouped. This is suggested already by the names of the individual reports. In the By Status report, timesheets are grouped by their statuses, in the By Type report then by their types, in the By Task report they are grouped by projects and tasks to which the timesheets are attached, and finally in the By Owner report they are grouped by the timesheet owners.
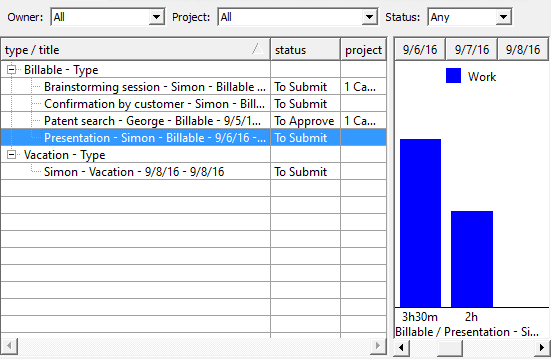
Aspects not used to group the timesheets are then found among report parameters and it is thus possible to, for example, display timesheets for a particular project and a particular owner grouped by their types.
Time data in the Value Line are represented in the form of a bar chart. The period of time displayed here also serves as a filter of the timesheets shown. In this respect it works similarly to the My Timesheets report.
Using the Timer
In addition to manual generation, timesheets can also be created semi-automatically using the Timer incorporated into the system. This method is suitable in cases when the user working on the tasks has at hand a computer running Instant Team.
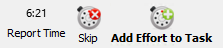
The Timer helps you measure time you spend on tasks and create timesheets from the measured data. You will find it in the toolbar in reports that display tasks and in the task window. Next to the Timer, there are two control buttons: Skip and Add Effort.
Before you start working on one of the tasks for which you want to report time using the Timer, press the Skip button in the toolbar (or else use the Actions/Timer/Skip menu or the <Shift+Ctrl+S> key combination). This resets the Timer.
Then start working on your task. The Timer measures time while you work. After you stop working on the task—regardless of whether you have completed it or you interrupted it and began working on something else—select the task you worked on (either in a report, for example the To Do report, or open a window containing the task) and press the Add Effort button (or else use the Actions/Timer/Add Effort menu or the <Ctrl+E> key combination; the Add Effort option is also accessible via the local menu of the specific task record).
This will automatically create a timesheet for the selected task and register in the relevant record the time measured by the Timer at that moment. The Timer is reset again at the same time. The character of the newly created timesheet is the same as that of timesheets you would create manually. Therefore, you will see it in the To Submit report and you can later modify its type, add notes to it, submit it for approval, and so on.
If you immediately continue working on another task for which you will report time using the Timer, you do not have to use Skip again. The Timer will go on measuring time and you will just use the Add Effort function after you finish working on the next task.
You can also add work to an already existing timesheet. The existing timesheet has to be open or selected in a report, or the local menu can be used directly from the report. The Add Effort button then does not create a new timesheet but only adds time measured by the Timer to the selected timesheet.
Even if a task is open or selected, a new timesheet is not necessarily created. The system first checks whether any existing timesheet created by the current user is linked to the chosen task. If it finds one or several such timesheets, it picks up the latest among them and further checks whether the content of this timesheet corresponds to default values (Owner = the default resource of the user, Type = Billable, Submitted = no, Approved = no, Note = empty). If this check is successful then it adds the effort to this timesheet. A new timesheet is created in all other cases. In practice, it means that the Add Effort button always starts by creating a new timesheet for a given task. Then it adds effort to this timesheet as long as it is not submitted or processed in some other way.
Automatic modification of the effort estimate
Time reporting based on the Timer entails one more automatic action—modification of the effort estimate for the task you report time for. This is because the system automatically decreases the estimate of remaining task effort by the time you reported. So if the effort estimate of a task was 1d7h (fifteen hours) and you report 2:30 (two and a half hours) for this task using the Timer then the effort estimate is modified to 1d4h30m (twelve and a half hours).
Assuming you work on a task at the same speed as originally estimated, then this automatic modification means that the value in the % Done field will accurately reflect the completion percentage of the task and the Remaining field will show you exactly how much work you will still do on the task. If your performance does not match the originally estimated one then the Remaining field will indicate to you how much time you were granted to complete the task. However, to have the right value in the % Done field, you should reevaluate and revise the remaining effort estimate yourself once in a while.
When you report time using the Timer for tasks that are not assigned to you and you are not the project manager then no automatic modification of the effort estimate takes place because you are not allowed to modify the task.
Reporting only part of the time measured by the Timer
Sometimes it can happen that you forget to use the Add Effort or Skip action on time. In order for you not to have to resort to manual record creation in such a case, Instant Team has another window for detailed time reporting based on the Timer. You open this window either by clicking on the Timer or the Report Time… option in the toolbar or via the Actions/Timer/Report Time… menu.
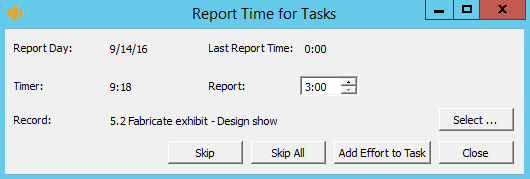
In this window, there are the familiar Skip and Add Effort functions. However, in the Report field you can enter the exact time you want to skip or report. If you do so then the Timer is not reset after skipping or adding effort and it just subtracts the time you entered.
You can also see here when the Timer was last used (Report Day and Last Report Time) and you can choose for which task you want to report time (the Record field and the associated Select… button).
Also the Skip All button is very useful. This is because using the standard Skip button you cannot skip more than one day at a time. However, the Skip All button always resets the Timer at once regardless of how far in the past the last measured time was. For example, if you were on a vacation for 14 days and you need to reset the Timer then using the Skip All button you can do all this by pressing a single button. If you wanted to use the Skip button instead, you would need to press it 14 times.
The window for detailed time reporting exists in two versions. The version shown above and called “Report Time for Tasks” enables you to choose a task to add effort to. The second version, called “Report Time for Timesheets”, enables you to pick an already existing timesheet directly.
The Overview database
60 days overview of all dates, capacities, inputs and outputs about each project and completely free.
All rights reserved, Created by eBRÁNA Privacy statement